
Easy Steps to Add Your Website to Google Search Console


If you want to enhance your website’s visibility and optimize its performance on Google, one of the essential steps is adding your website to Google Search Console. This powerful tool allows you to monitor your website’s presence in search results, identify indexing issues, and gain valuable insights into how users discover and interact with your site. To help you get started, here are some easy steps to add your website to Google Search Console.
Step 1: Sign in or Create a Google Account
To begin the process, sign in with your existing Google account or create a new one if you don’t have an account already. It’s important to use an account that is associated with your website or business for seamless management.
Step 2: Access Google Search Console
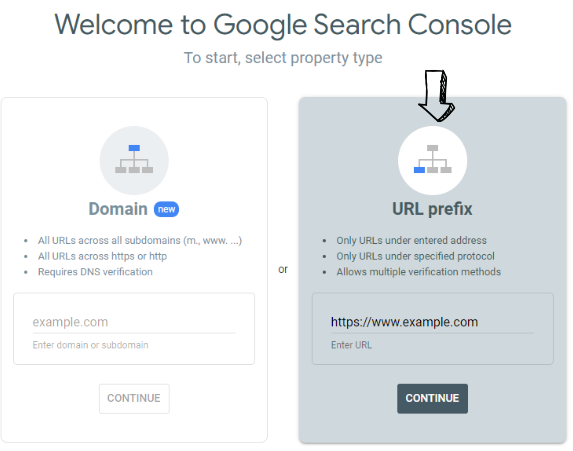
Once signed in, visit the Google Search Console homepage. Here, you’ll find an option to add a new property (your website URL) by clicking on the “Add Property” button.
Step 3: Enter Your Website URL
In this step, enter the URL of your website into the provided field. Make sure to include the full address (e.g., https://www.example.com) and double-check for any typos or errors.
Step 4: Verify Ownership of Your Website
To prove that you are the rightful owner of the website you’re trying to add, Google requires verification. There are several methods available for verification:
- HTML File Upload: Download an HTML file provided by Google and upload it to your website’s root directory.
- HTML Tag: Copy a meta tag provided by Google and paste it into the
<head>section of your homepage. - Domain Name Provider: If your domain is registered with specific providers like Namecheap or GoDaddy, select this option for automatic verification.
- Google Analytics: If you have Google Analytics set up for your website, you can verify ownership through your Analytics account.
Choose the verification method that works best for you and follow the instructions provided by Google. Once verified, you’ll gain full access to the features and insights of Google Search Console.
Step 5: Submit a Sitemap
To ensure that Google indexes your website’s pages accurately, it’s recommended to submit a sitemap. A sitemap is a xml file that lists all the URLs on your site and provides additional information about each page’s content. You can generate a sitemap using various online tools such as xml-sitemaps.com or plugins specific to your content management system (CMS).
Once generated or downloaded, the file name will be sitemap.xml. Upload it to in the root directory of your website where other site files like index.html are located. After that, submit the sitemap URL (not the file) sitemap.xml through Google Search Console under the “Sitemaps” section.
Step 6: Add robots.txt in the root of your website
robots.txt is a text file placed in a website’s root directory to provide instructions to search engine crawlers. It controls which parts of the website should be crawled and indexed.
- Using any text editor, such as Notepad or Sublime Text, create a new file named
robots.txt. - In the text file, specify the rules and directives you want search engine crawlers to follow. In general, the following form is widly used to allow your website to be crawled and indexed in any search engine.
  User-Agent:*
  Allow: /

  Sitemap: https://example.com/sitemap.xml
- Save the text file and upload it to the root directory of your website where other site files like
index.htmlare located. - Open a web browser and enter your website domain name followed by
/robots.txt(e.g., www.example.com/robots.txt). This will display the contents of yourrobots.txtfile if it has been successfully uploaded.
Step 7: Wait for your website to be indexed in Chrome by Google search engine crawler
What happens the next is that Google continuously crawls the web to discover new content and update their index including your submission. The exact timing of when your website will be indexed can be unpredictable.
It could take a few days to several weeks for your website to appear in search results after it has been crawled. Because, it depends on several factors such as the search engine’s crawling schedule, the size and complexity of your website, the quality of your website’s content, and various technical considerations.
How to Manually Request Your Website Indexing
Want your website to appear in search results of Chrome browser much faster?
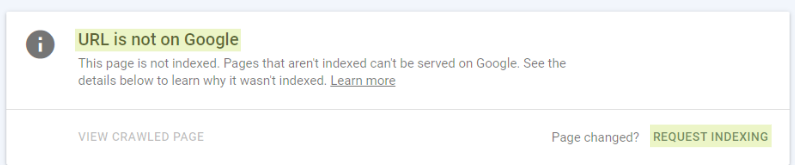
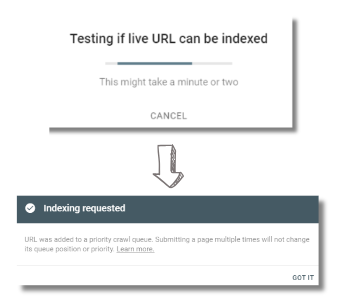
Simply enter or paste the specific URL of the webpage you want to manually add to Google’s index in the search bar (URL Inspection Tool) within your property page.

If it says “URL is not on google”, you can request indexing by clicking on “Request Indexing”. This prompts Google to (re)crawl and (re)evaluate that specific page for inclusion in their search index. Once requested for indexing, monitor the status of your request through Search Console’s Index Coverage report or by revisiting the URL Inspection tool periodically.
Step 8: Explore Search Console Features
Congratulations! You’ve successfully added your website to Google Search Console. Now it’s time to explore its features and make use of its valuable insights. Dive into sections like “Performance” to analyze search traffic data, “Coverage” to identify indexing issues, or “URL Inspection” to check how specific pages are indexed by Google.
Adding your website to Google Search Console is an important step towards improving its visibility and optimizing its performance on Google search engine, which is one of the largest search engines in the world. By following these steps, you’ll gain access to valuable data and tools that can help enhance your SEO efforts and drive more organic traffic to your site.


Leave a comment